I recently made the following Peppa Pig Cake for our friends Granddaughter and thought I would give you a guide on how to make your own. Please note that I made the cake the day before to allow it to cool and settle for 24hrs prior to decoration.
Day 1
Firstly I made an 8 inch Madeira cake using this method: Madeira Cake All in one method.
The quantities I used were:
450 Grams Plain Flour (All-purpose for the US)
2 Teaspoons Baking Powder
400 Grams Caster Sugar (Superfine for the US)
400 Grams Margarine
7 Medium Eggs
3 Tablespoons Semi Skimmed Milk
I baked it at 150°C/300F for 1 hour 50 mins.
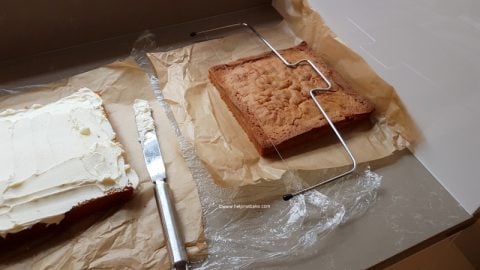
Once baked, I placed the tin on a wet tea towel on top of a wire rack to cool and allow for easy release.
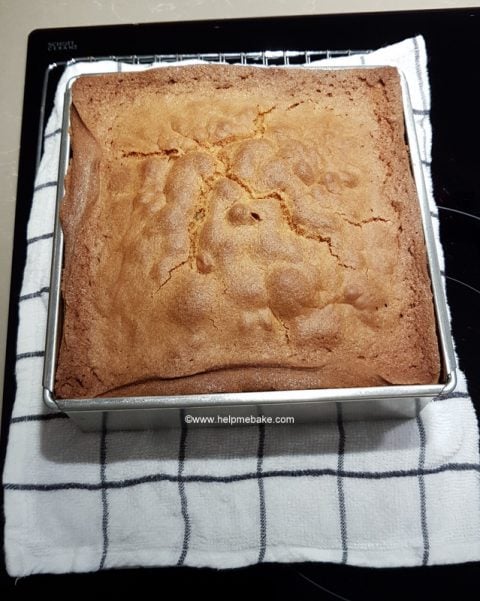
I left it for 10 minutes then turned it out onto a wire rack.
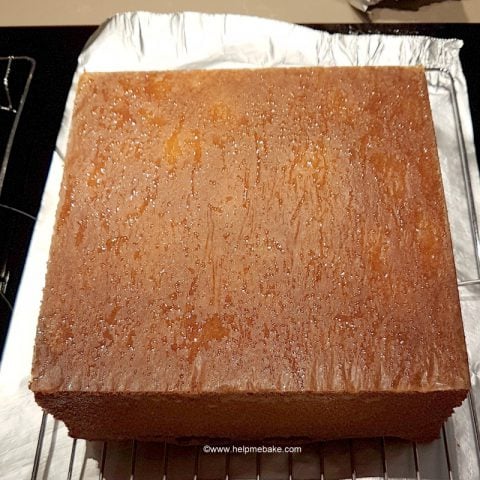
I then very carefully peeled the baking sheet from the cake whilst it was still hot. I used a palette knife to help slowly remove the sheet.
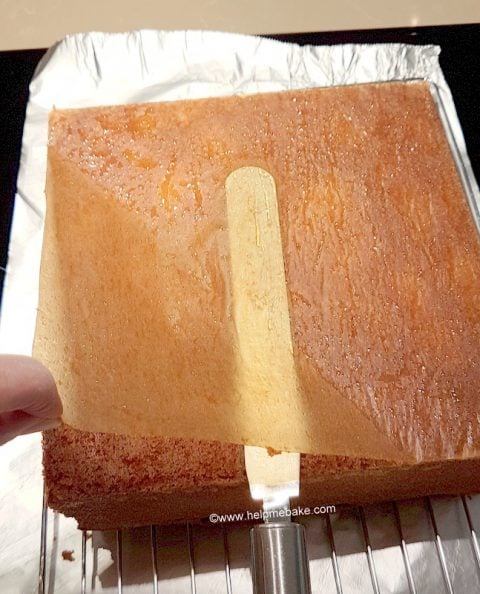
The cake was then left to fully cool. Once cooled I wrapped it back up in baking paper and clingfilm (plastic wrap) to allow it to settle before cutting the following day.
Day 2
Now that the cake has had time to settle, we can get on with the decorating part!
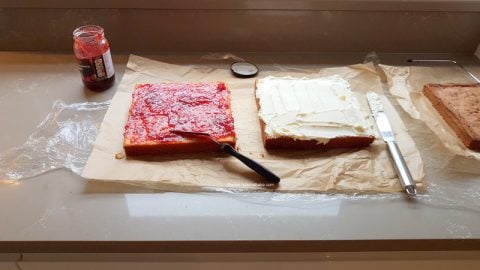
Firstly I levelled, filled and covered the cake using a Cake Leveller to level it off and then covered one side in jam and the other in buttercream,
I then sandwiched the cake together, covering the remainder of it with jam.
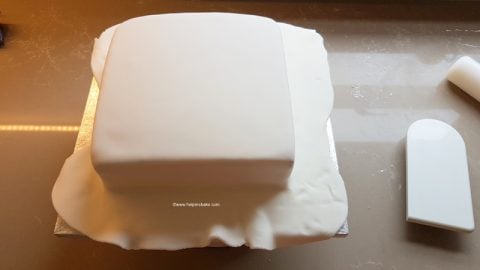
I covered the cake with white icing fondant first so that when I joined the green and blue icing later, there wouldn't be any jam or stickiness showing through.
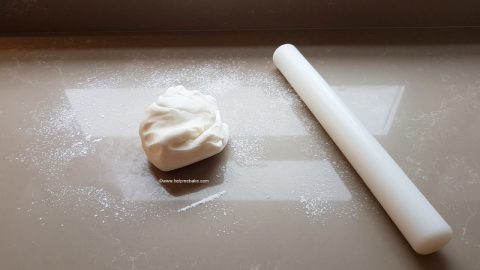
I rolled it out to about 3mm thick.
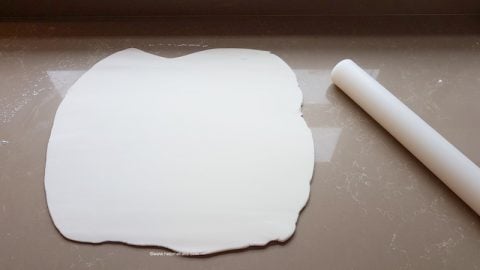
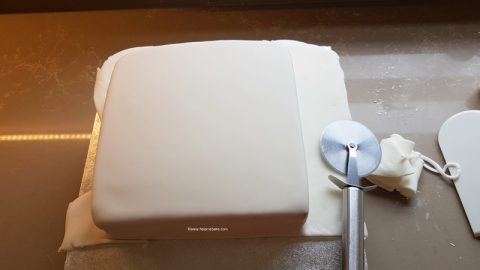
I then placed the icing fondant on top of the cake and started to smooth it over with a cake smoother.
Once smoothed I cut the excess off with a pizza cutter.
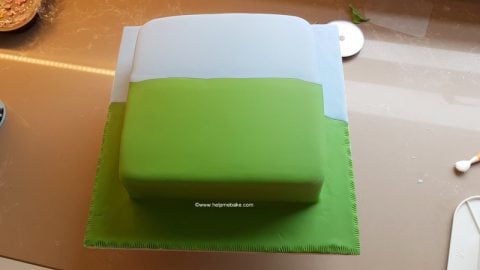
I then rolled out the Baby blue icing and Lincoln green icing from Renshaw's and then stuck them to the cake using water.
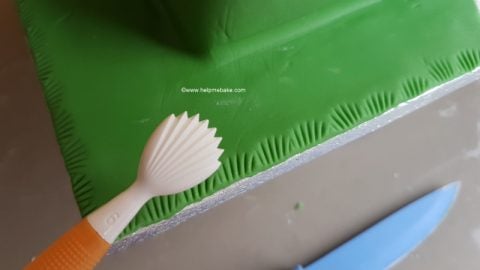
I made the grass indentations with a Shell Tool from my Wilton Tool Kit.
To make the sun, I used my Jem Cutter and circle cutter. To create the rays, I cut down one of the strips from the Jem cutter and made them all the same size.
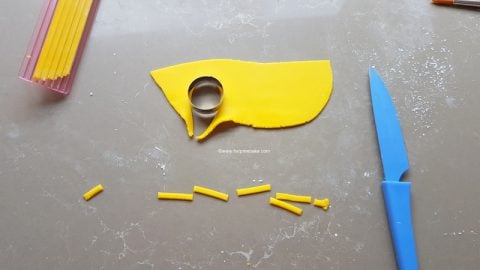
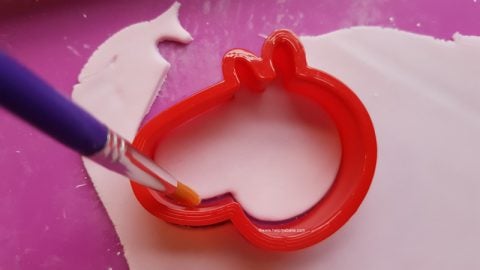
To make Peppa, I had pre-bought a Peppa Pig Cookie Cutter.(For the US, please try here for Peppa Pig Cutters)
This has to be one of the best £3's I have ever spent. I used the smallest of the two cookie cutters on rolled out pink Renshaw's icing and then smoothed off the edges with a paintbrush while in the cutter so as not to distort her face.
I then rolled out Poppy Red Renshaw's icing and cut an oval shape using an easter egg-shaped cutter for Peppa's dress.
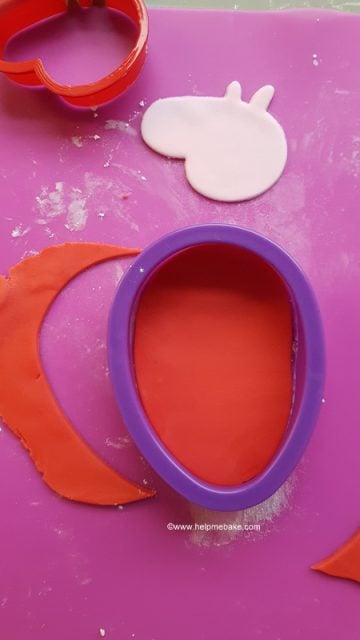
Once I had the shape of the dress, I then used the Peppa cookie cutter to cut out the part of the dress where her head would fit into it.
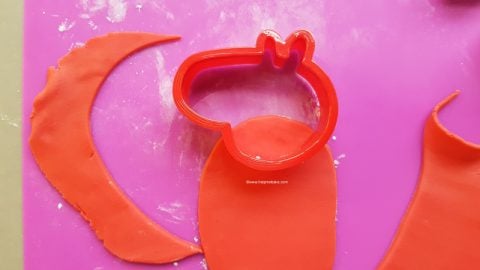
I then measured her head in the slot to make sure she fit.
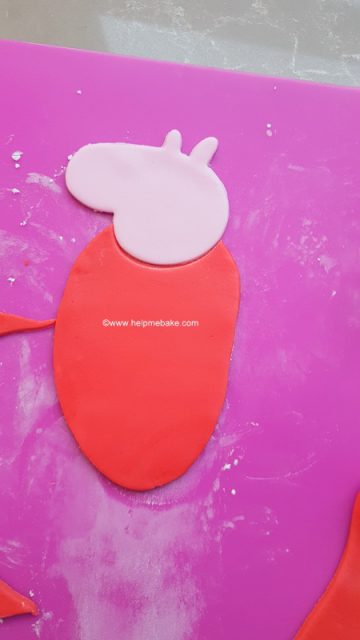
To make the rest of Peppa, I sliced a straight line off the bottom off the excess red icing fondant to make the dress.
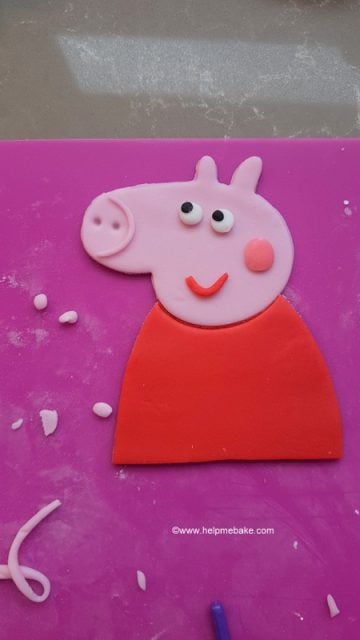
I rolled a small sausage for her mouth and then rolled further small balls with white and black icing in my fingers to create her eyes and pupils.
I made a small sausage for the outline of her nose and indented the nose section of her face with a ball tool making it easier for me to place the pink nostril balls in later.
The darker pink blush mark on her face was pink icing mixed with a little cherry red sugar flair dye to make the pink a little darker.
For her arms and legs, I rolled very slim sausages and stuck them with water (to remove the excess watermarks on the cake I dusted over them with a paintbrush lightly coated in icing sugar (Confectioner's Sugar in the US) to absorb the moisture).
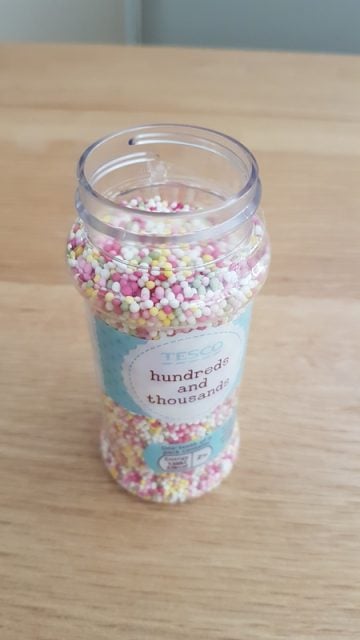
For the flowers, I used blossom push cutters and then filled them with 100's and 1000's.
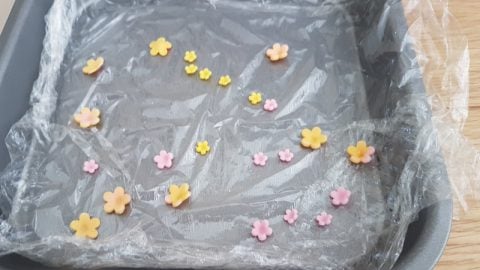
To do this, I carefully dampened the end of a paintbrush, placed the 100's and 1000's on a plate and then picked them up using the damp end of the brush, placed them in the centre of the flower and then used the other end to push them in.
To make the clouds I used my Fmm Cloud Cutter and used the No 2 Cloud and to make the small butterfly, I used a small PME Butterfly push cutter.
To make Sofia's name and age, I used my Cake Star Letter and Number Cutters.
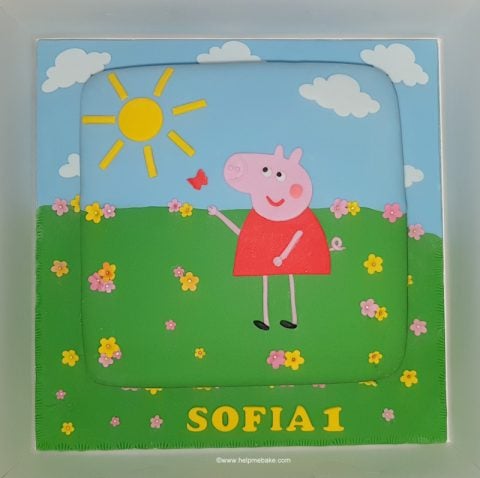
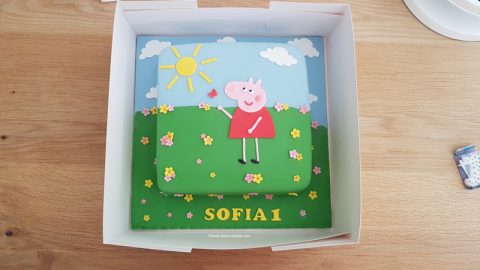
So this is how the final cake looked.....or so I thought!
There was something that was bugging me, and it wasn't until after I had dropped the cake off did I realise what was missing......the tail!
I know that she isn't outlined as per my previous Peppa Pig Cake, however, after trying numerous ways to try and outline her (this went from rolling small sausages to squeezing the life out of my craft gun, I realised that she actually looked fine the way she was which is why I left her as is). I did, however, venture back to our friends and put her tail on.
This is what the final, final edition actually looked like.
And this is little Princess Sofia; she was thrilled with her cake.
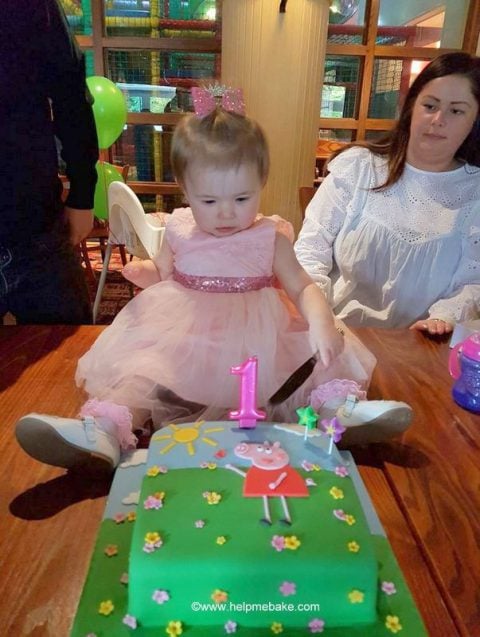
To a gorgeous girl on her first birthday! Happy Birthday!
Day 1
Firstly I made an 8 inch Madeira cake using this method: Madeira Cake All in one method.
The quantities I used were:
450 Grams Plain Flour (All-purpose for the US)
2 Teaspoons Baking Powder
400 Grams Caster Sugar (Superfine for the US)
400 Grams Margarine
7 Medium Eggs
3 Tablespoons Semi Skimmed Milk
I baked it at 150°C/300F for 1 hour 50 mins.
Once baked, I placed the tin on a wet tea towel on top of a wire rack to cool and allow for easy release.
I left it for 10 minutes then turned it out onto a wire rack.
I then very carefully peeled the baking sheet from the cake whilst it was still hot. I used a palette knife to help slowly remove the sheet.
The cake was then left to fully cool. Once cooled I wrapped it back up in baking paper and clingfilm (plastic wrap) to allow it to settle before cutting the following day.
Day 2
Now that the cake has had time to settle, we can get on with the decorating part!
Firstly I levelled, filled and covered the cake using a Cake Leveller to level it off and then covered one side in jam and the other in buttercream,
I then sandwiched the cake together, covering the remainder of it with jam.
I covered the cake with white icing fondant first so that when I joined the green and blue icing later, there wouldn't be any jam or stickiness showing through.
I rolled it out to about 3mm thick.
I then placed the icing fondant on top of the cake and started to smooth it over with a cake smoother.
Once smoothed I cut the excess off with a pizza cutter.
I then rolled out the Baby blue icing and Lincoln green icing from Renshaw's and then stuck them to the cake using water.
I made the grass indentations with a Shell Tool from my Wilton Tool Kit.
To make the sun, I used my Jem Cutter and circle cutter. To create the rays, I cut down one of the strips from the Jem cutter and made them all the same size.
To make Peppa, I had pre-bought a Peppa Pig Cookie Cutter.(For the US, please try here for Peppa Pig Cutters)
This has to be one of the best £3's I have ever spent. I used the smallest of the two cookie cutters on rolled out pink Renshaw's icing and then smoothed off the edges with a paintbrush while in the cutter so as not to distort her face.
I then rolled out Poppy Red Renshaw's icing and cut an oval shape using an easter egg-shaped cutter for Peppa's dress.
Once I had the shape of the dress, I then used the Peppa cookie cutter to cut out the part of the dress where her head would fit into it.
I then measured her head in the slot to make sure she fit.
To make the rest of Peppa, I sliced a straight line off the bottom off the excess red icing fondant to make the dress.
I rolled a small sausage for her mouth and then rolled further small balls with white and black icing in my fingers to create her eyes and pupils.
I made a small sausage for the outline of her nose and indented the nose section of her face with a ball tool making it easier for me to place the pink nostril balls in later.
The darker pink blush mark on her face was pink icing mixed with a little cherry red sugar flair dye to make the pink a little darker.
For her arms and legs, I rolled very slim sausages and stuck them with water (to remove the excess watermarks on the cake I dusted over them with a paintbrush lightly coated in icing sugar (Confectioner's Sugar in the US) to absorb the moisture).
For the flowers, I used blossom push cutters and then filled them with 100's and 1000's.
To do this, I carefully dampened the end of a paintbrush, placed the 100's and 1000's on a plate and then picked them up using the damp end of the brush, placed them in the centre of the flower and then used the other end to push them in.
To make the clouds I used my Fmm Cloud Cutter and used the No 2 Cloud and to make the small butterfly, I used a small PME Butterfly push cutter.
To make Sofia's name and age, I used my Cake Star Letter and Number Cutters.
So this is how the final cake looked.....or so I thought!
There was something that was bugging me, and it wasn't until after I had dropped the cake off did I realise what was missing......the tail!
I know that she isn't outlined as per my previous Peppa Pig Cake, however, after trying numerous ways to try and outline her (this went from rolling small sausages to squeezing the life out of my craft gun, I realised that she actually looked fine the way she was which is why I left her as is). I did, however, venture back to our friends and put her tail on.
This is what the final, final edition actually looked like.
And this is little Princess Sofia; she was thrilled with her cake.
To a gorgeous girl on her first birthday! Happy Birthday!
Last edited: