Unicorns are lovely little mystical creatures that seem to be adored by everyone, so what better way of bringing your favourite creatures to life than making an edible one! Whether it be for kids or adults alike, I'm sure the recipient of this lovely whimsical creature will thoroughly enjoy it.
 (Medium).jpg")
 (Medium).jpg")
 (Medium).jpg")
 (Medium).jpg")
2 Take a blob of white icing fondant and sprinkle some Tylo powder in the corner of your mat.
 (Medium).jpg")
3 Rub the blob of icing fondant into the Tylo powder.
 (Medium).jpg")
4 Start to knead the powder into the icing fondant by rolling it in your hands.
 (Medium).jpg")
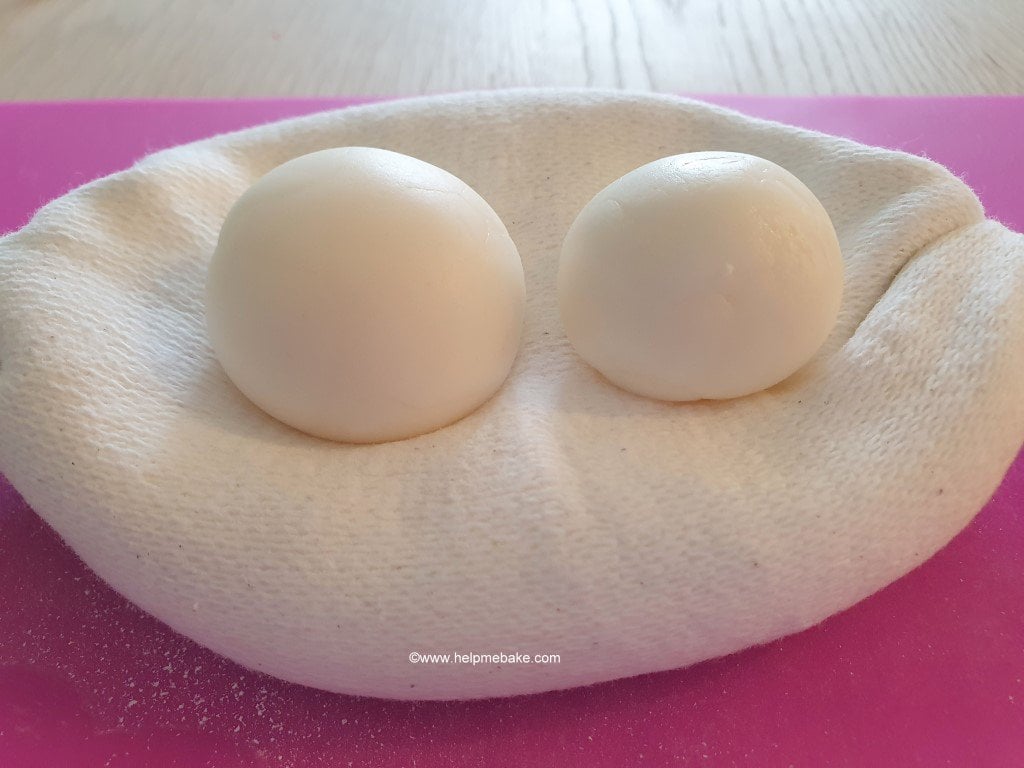
5 Roll the icing fondant into a ball, making sure all the powder has absorbed into it.
 (Medium).jpg")
6 Start smoothing the icing fondant between both hands and start making a cone shape.
 (Medium).jpg")
 (Medium).jpg")
7 Place it on your cake board and check out the size. If you are happy with it, then continue; if not, repeat steps 4 - 6 until you get the correct shape.
 (Medium).jpg")
8 I then inserted a cocktail stick into the 'body' part of the unicorn. You can substitute this for a candy stick or piece of dried linguine if you prefer. Make sure there is enough stick poking out to support the head.
 (Medium).jpg")
9 Now, take another piece of icing fondant, dab it in the tylo powder and start to rub it in.
 (Medium).jpg")
10 Split the icing in half, as this will give you two even pieces to use for the legs.
 (Medium).jpg")
11 As you can see from the picture, there is too much icing fondant, and the leg is too big.
 (Medium).jpg")
12 I then removed some of the icing fondant and re-rolled the leg.
 (Medium).jpg")
13 I re-rolled it between my palms and then shaped it with my thumb and forefinger to taper the edge.
 (Medium).jpg")
 (Medium).jpg")
 (Medium).jpg")
14 As you can see, it's now a much better size. Stick the leg on using edible glue. (I used the vodka from my water pen).
 (Medium).jpg")
15 Now make another leg. You could also make another two for the arms/legs if you like. (I made mine later).
 (Medium).jpg")
16 This is what the legs will look like from the back of the Unicorn. Again I stuck the other leg on with vodka from my water pen, but you could use edible glue.
 (Medium).jpg")
17 Now to work on the head. Firstly add some more tylo to a piece of icing fondant and roll it into a ball.
 (Medium).jpg")
18 Size it against the body...as you can see, it's too big.
 (Medium).jpg")
19 Remove some of the icing fondant and re-roll.
 (Medium).jpg")
Place it against your unicorn body and see if it's the correct size. If you are happy, then move on to no 20; if not, remove some more icing fondant and then re-roll again.
 (Medium).jpg")
20 Now for the indent in the face. Note: If you want the back of the head to remain round, then hold the unicorn head in the palm of one hand and then push your little finger into it with the other. As per the below picture, I did mine on the mat and slightly flattened the back of the head.
 (Medium).jpg")
If you wish the head to remain in shape, then try using a head cradle to prevent the flattening of the head.
 www.helpmebake.com
21 This is what the indentation should look like.
 (Medium).jpg")
22 Now, make two eye sockets with the small end of the ball tool.
 (Medium).jpg")
 (Medium).jpg")
 (Medium).jpg")
23 I then took two black edible pearls that were the same size.
 (Medium).jpg")
24 Place them in the sockets; if you don't have pearls, roll two small balls of black icing fondant and use those instead. I then used the larger end of the ball tool to push them in place.
 (Medium).jpg")
25 Now roll two tiny pieces of white icing fondant.
 (Medium).jpg")
26 Carefully place them in the nostril area.
 (Medium).jpg")
27 Now, use the dotting tool to push a tiny hole into them.
 (Medium).jpg")
28 Now, place the head on top of the body. Note: If you are using a candy stick, make a hole in the bottom of the head first before pushing onto the body; otherwise, you may squeeze the head out of shape.
 (Medium).jpg")
29 Now, onto the rosy cheeks. Pour a small amount of Pink Lustre dust onto a piece of kitchen towel/roll.
 (Medium).jpg")
30 Dab your paintbrush into the lustre and then dust it onto the kitchen roll. This takes off the excess. Tip: If you want to soften the lustre and lighten it slightly, add a touch of cornflour to it.
 (Medium).jpg")
31 Test the lustre dust onto a piece of spare icing fondant; you can then check the colour of it and whether there is too much or too little on your brush.
 (Medium).jpg")
32 Once you are happy, lightly dust the cheeks of the unicorn with it.
 (Medium).jpg")
33 Now for the ears. Make two small balls of icing/fondant.
 (Medium).jpg")
34 Flatten them with your fingers, and then lightly pinch the ends of them with your thumb and forefinger to make a point.
 (Medium).jpg")
35 Use a Dresden tool to make the indent of the ear.
 (Medium).jpg")
 (Medium).jpg")
36 Then lightly dust the ears with pink lustre dust.
 (Medium).jpg")
 (Medium).jpg")
37 I then started to make another set of arm/legs. You may have already made them when I mentioned it before.
 (Medium).jpg")
 (Medium).jpg")
38 If you are unsure whether to place the arm/legs in the air (because it can get a bit fiddly), then you can always place them in front like this.
 (Medium).jpg")
39 If you wish to carry on, then do this. Taper the edge of the leg add edible glue, or in this case, I used vodka that was in my water pen and use that to stick the arm/leg to the body.
 (Medium).jpg")
Please note that it took me a few times to get the arm/legs in position without everything moving.
 (Medium).jpg")
40 Once they were in place, I very carefully and softly wrapped the body with cling film/saran wrap to add support to the arm/legs while they dried. I then went off to make a cup of tea.
 (Medium).jpg")
41 Now for the unicorn horn. Roll a very thin sausage.
 (Medium).jpg")
42 Put the ends together and squeeze them slightly.
 (Medium).jpg")
43 Put your thumb and forefinger at the ends you've squoze together and twist; this will then start to resemble a unicorn horn.
 (Medium).jpg")
44 The more you rotate and twist the icing/fondant, the tighter the shape of the horn.
 (Medium).jpg")
45 Cut off any excess.
 (Medium).jpg")
46 Then make some edible paint using gold lustre and vodka and paint the unicorn horn with a paintbrush. Or, if you prefer, you could use the Click Twist Brush to paint it. If you are using lustre and vodka, you may need more than one coat. Leave to dry, then attach to the unicorn using edible glue later when you've done the mane. Be quick, though, as vodka evaporates, so you may need to keep making paint unless you put it in a sealed pot.
 (Medium).jpg")
47 You can now remove the cling film/saran wrap from the body so we can start on the mane & tail. Start by rolling small strips of icing/fondant in your fingers like so.
 (Medium).jpg")
I used the heat from my hands to stick the mane on the unicorn, but you can use a little edible glue.
 (Medium).jpg")
Keep making strips until you have done all the rainbow colours in order. Red, Orange Yellow, Green Blue, Lavender
 (Medium).jpg")
 (Medium).jpg")
48 This is what the mane looks like from the top angle.
 (Medium).jpg")
49 Now you know where the mane fringe will be, you can stick the ears on using edible glue.
 (Medium).jpg")
 (Medium).jpg")
50 Then, take some small pieces of icing fondant for the tail.
.jpg")
51 I started with the Lavender one, first rolled it thin, then attached them in a backwards order blue, green, yellow, orange until I reached red. You can also see that I've coloured in the arm/legs with the metallic light gold click brush and stuck the horn in the middle of the head with a little edible glue.
 (Medium).jpg")
 (Medium).jpg")
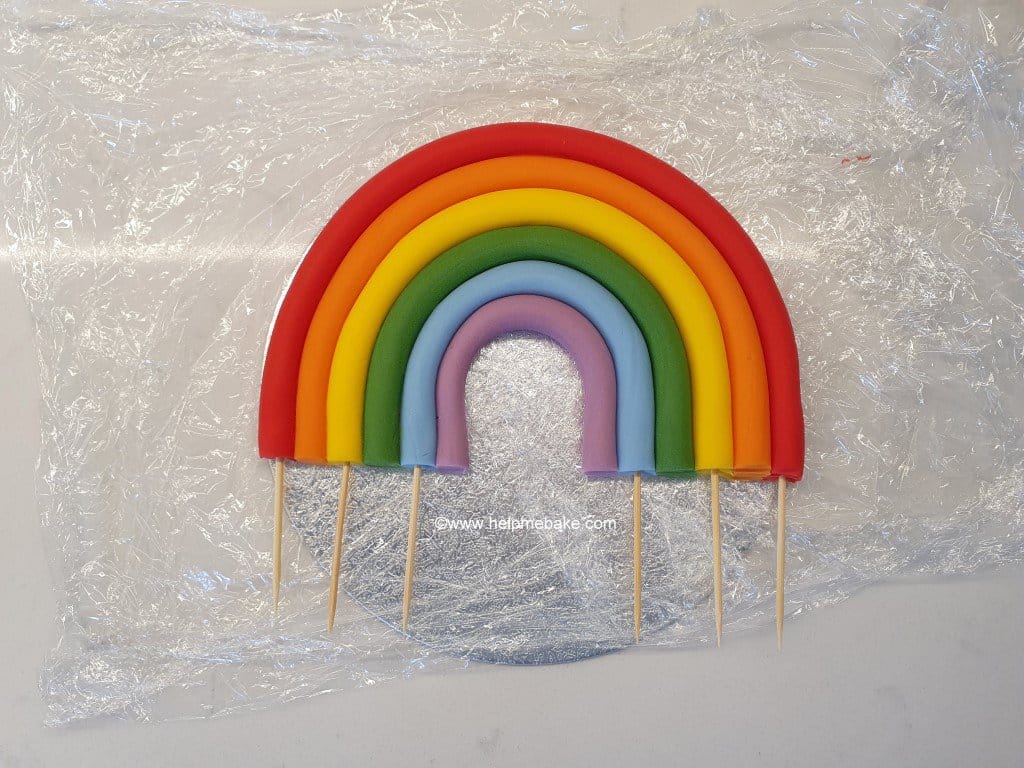
52 Here's the finished tail. You can see that the colours match the mane.
 (Medium).jpg")
And there you have it, one edible Rainbow Unicorn Cake Topper. I hope you've enjoyed the tutorial.
 (Medium).jpg")
Also see...
 www.helpmebake.com
How do I make a Rainbow Unicorn Cake Topper?
To make an edible Unicorn cake topper, you will need the following items:- Icing Fondant
- Lustre Dust - Gold & Pink
- Click- Twist Brush - Metallic Light Gold
- Double-ended Ball Tool
- Ball Dotting Tool
- Scallop/Comb Tool - (If you wish to make a mouth).
- Dresden Tool
- Paintbrushes
- Kitchen Towel/Roll
- Tylo/CMC Powder - (This is a hardener that will help your topper supports itself).
- Black Pearls or Black Icing
- Cocktail Sticks/Edible Candy Sticks or Dried Linguine
- Silicone Mat
- Cake Board
- Cling film or Saran Wrap
- Edible Glue or
- Water Pen with Vodka
What Colours did you use for the Rainbow Unicorn? I used Renshaw...
- Poppy Red
- Tiger Orange
- Yellow
- Lincoln Green
- Baby Blue
- Dusky Lavender
- White Icing Fondant - Waitrose
Method
1 Take a cake board the same size as your cake will be and place it on the table in front of you. You will be using this to 'size' your Rainbow Unicorn topper. I.e. You will constantly be placing the topper on this board to ensure that you have the right size Unicorn for your finished cake. You may wish to place a piece of cling film/saran wrap on top of it to stop the unicorn from sticking to it.2 Take a blob of white icing fondant and sprinkle some Tylo powder in the corner of your mat.
3 Rub the blob of icing fondant into the Tylo powder.
4 Start to knead the powder into the icing fondant by rolling it in your hands.
5 Roll the icing fondant into a ball, making sure all the powder has absorbed into it.
6 Start smoothing the icing fondant between both hands and start making a cone shape.
7 Place it on your cake board and check out the size. If you are happy with it, then continue; if not, repeat steps 4 - 6 until you get the correct shape.
8 I then inserted a cocktail stick into the 'body' part of the unicorn. You can substitute this for a candy stick or piece of dried linguine if you prefer. Make sure there is enough stick poking out to support the head.
9 Now, take another piece of icing fondant, dab it in the tylo powder and start to rub it in.
10 Split the icing in half, as this will give you two even pieces to use for the legs.
11 As you can see from the picture, there is too much icing fondant, and the leg is too big.
12 I then removed some of the icing fondant and re-rolled the leg.
13 I re-rolled it between my palms and then shaped it with my thumb and forefinger to taper the edge.
14 As you can see, it's now a much better size. Stick the leg on using edible glue. (I used the vodka from my water pen).
15 Now make another leg. You could also make another two for the arms/legs if you like. (I made mine later).
16 This is what the legs will look like from the back of the Unicorn. Again I stuck the other leg on with vodka from my water pen, but you could use edible glue.
17 Now to work on the head. Firstly add some more tylo to a piece of icing fondant and roll it into a ball.
18 Size it against the body...as you can see, it's too big.
19 Remove some of the icing fondant and re-roll.
Place it against your unicorn body and see if it's the correct size. If you are happy, then move on to no 20; if not, remove some more icing fondant and then re-roll again.
20 Now for the indent in the face. Note: If you want the back of the head to remain round, then hold the unicorn head in the palm of one hand and then push your little finger into it with the other. As per the below picture, I did mine on the mat and slightly flattened the back of the head.
If you wish the head to remain in shape, then try using a head cradle to prevent the flattening of the head.
How to make a cornflour pouch cradle for edible model heads. (Handsfree)
If, like me, you've flattened or misshaped a few model heads when making edible decorations, then here's a perfect solution for you. In order to prevent the dreaded flatness from occurring when you've created your faces on the table, then why not try out this ingenious idea instead. I'm...
21 This is what the indentation should look like.
22 Now, make two eye sockets with the small end of the ball tool.
23 I then took two black edible pearls that were the same size.
24 Place them in the sockets; if you don't have pearls, roll two small balls of black icing fondant and use those instead. I then used the larger end of the ball tool to push them in place.
25 Now roll two tiny pieces of white icing fondant.
26 Carefully place them in the nostril area.
27 Now, use the dotting tool to push a tiny hole into them.
28 Now, place the head on top of the body. Note: If you are using a candy stick, make a hole in the bottom of the head first before pushing onto the body; otherwise, you may squeeze the head out of shape.
29 Now, onto the rosy cheeks. Pour a small amount of Pink Lustre dust onto a piece of kitchen towel/roll.
30 Dab your paintbrush into the lustre and then dust it onto the kitchen roll. This takes off the excess. Tip: If you want to soften the lustre and lighten it slightly, add a touch of cornflour to it.
31 Test the lustre dust onto a piece of spare icing fondant; you can then check the colour of it and whether there is too much or too little on your brush.
32 Once you are happy, lightly dust the cheeks of the unicorn with it.
33 Now for the ears. Make two small balls of icing/fondant.
34 Flatten them with your fingers, and then lightly pinch the ends of them with your thumb and forefinger to make a point.
35 Use a Dresden tool to make the indent of the ear.
36 Then lightly dust the ears with pink lustre dust.
37 I then started to make another set of arm/legs. You may have already made them when I mentioned it before.
38 If you are unsure whether to place the arm/legs in the air (because it can get a bit fiddly), then you can always place them in front like this.
39 If you wish to carry on, then do this. Taper the edge of the leg add edible glue, or in this case, I used vodka that was in my water pen and use that to stick the arm/leg to the body.
Please note that it took me a few times to get the arm/legs in position without everything moving.
40 Once they were in place, I very carefully and softly wrapped the body with cling film/saran wrap to add support to the arm/legs while they dried. I then went off to make a cup of tea.
41 Now for the unicorn horn. Roll a very thin sausage.
42 Put the ends together and squeeze them slightly.
43 Put your thumb and forefinger at the ends you've squoze together and twist; this will then start to resemble a unicorn horn.
44 The more you rotate and twist the icing/fondant, the tighter the shape of the horn.
45 Cut off any excess.
46 Then make some edible paint using gold lustre and vodka and paint the unicorn horn with a paintbrush. Or, if you prefer, you could use the Click Twist Brush to paint it. If you are using lustre and vodka, you may need more than one coat. Leave to dry, then attach to the unicorn using edible glue later when you've done the mane. Be quick, though, as vodka evaporates, so you may need to keep making paint unless you put it in a sealed pot.
47 You can now remove the cling film/saran wrap from the body so we can start on the mane & tail. Start by rolling small strips of icing/fondant in your fingers like so.
I used the heat from my hands to stick the mane on the unicorn, but you can use a little edible glue.
Keep making strips until you have done all the rainbow colours in order. Red, Orange Yellow, Green Blue, Lavender
48 This is what the mane looks like from the top angle.
49 Now you know where the mane fringe will be, you can stick the ears on using edible glue.
50 Then, take some small pieces of icing fondant for the tail.
51 I started with the Lavender one, first rolled it thin, then attached them in a backwards order blue, green, yellow, orange until I reached red. You can also see that I've coloured in the arm/legs with the metallic light gold click brush and stuck the horn in the middle of the head with a little edible glue.
52 Here's the finished tail. You can see that the colours match the mane.
And there you have it, one edible Rainbow Unicorn Cake Topper.
I hope you've enjoyed the tutorial.Also see...
How to make a Rainbow Cake Topper - Tutorial
Seeing as Rainbows and Unicorns aren't going anywhere soon, I thought it only fair to put together a tutorial to show you how to make a Rainbow Cake Topper. This tutorial will show you two ways of making the rainbow topper using icing/fondant. How do I make a Rainbow Cake Topper? To make...
Last edited: